Showing posts with label Crafts. Show all posts

Friday, 7 March 2014

Tent and Toy Box


It's been a great week. We had another birthday to celebrate. My toddler is now a three-year-old. We had so much fun with his birthday party. And speaking of parties, I realized as we were all singing to him our family is big enough that we make a party all by ourselves without outside help. ☺
 
Anyway, he wanted pizza and panda cake. My children love my homemade pizza. Actually, I just mix up the crust nowadays and they spread it in the pan and add all the toppings. I also made a "diet" pizza for myself. The crust is made with cauliflower, spices, cheese and eggs. It is baked before being topped. It's an AMAZING crust...homemade pizza at its finest. For the panda cake I found directions for turning cupcakes into a panda head. My ten-year-old daughter worked on this with me, and they were cute.
 
 
In my Pinterest wanderings, I came across directions for making an indoor tent. We decided this was a project our children could make for their little brother. The boys did the woodwork, and the girls did the seams - all two of them. It was a simple project and turned out beautifully. Our little boy was delighted.
 

He also received books and a Thomas the Tank Engine dvd. All in all a great birthday for a wonderful little boy.
 
Sewing - how I love it. I made a cover for our tiny living room toy box and gave a tutorial for it early this week. I was also able to get a little ahead in the kitchen. I made some breakfast bars which are great for a quick breakfast or snack.
 
Today we had sunshine AND warmer temperatures so I walked to the library with some of my children. It was so nice. Speaking of that walk - I picked up the prize for my next giveaway while I was out. Let's just say that I'm going to have a hard time letting this one go. I wish now I'd ordered an extra one for myself. I'll be announcing the details for that giveaway next week so stay tuned.
 
How was your week? Did your weather warm up enough to give you hope that spring may be on the way?
Pin It

Tuesday, 4 March 2014

A Toy Box Cover

 
Today I did a sewing project that has been on my list for a while. That always makes me happy. The reason it was on my list so long is because I had to figure out how exactly I wanted to do it. I wanted to cover the small toy box we keep in our living room. We use a small cardboard box. It was ugly since it was obviously a packing box. I had some leftover fabric from some curtains I made. I knew what I wanted to use just not how to do it. Then a couple of days ago the design hit me.
 
I wanted to be able to take the cover off because cardboard boxes tend to fall apart and in case it needed to be washed. My problem was how to make it removable but still stay on the box. I'll show you how I did it.
 
First I measured my box. I cut a piece for the bottom that was 1/2 inch larger on all sides. So my box was 8" square - I made the fabric 9" square. Then I cut the fabric for the sides 9 x 14". The box is 11" tall, but I needed extra length.
 
Then I marked one-quarter inch from the edge on each side and sewed the sides to the bottom starting and stopping at the quarter inch mark.


Here's the cover before I put the box in.


Then I sewed a casing for elastic.


I put the elastic in and then put the box in. The elastic holds the cover around the box, but it gives so that I can put the cover on and off.


The finished product - doesn't look like a toy box, does it?


And since I was in a sewing mode I decided to do another small project. I had a bath sheet that somehow got a hole in the middle of it. I didn't want to throw it away because a big portion of the edges was still good. So I cut the useable parts into washcloth size squares and serged any raw edges. They're not pretty, but they'll do the job. Won't be giving them to my guests so don't worry if you come to visit, but my children won't mind. ☺


What projects have you been able to cross off your list recently? It's a good feeling, eh?


Pin It

Monday, 3 February 2014

Family Love

These two don't need a special day to celebrate their love. They're best buddies for life.
 
I've never been  a big fan of Valentine's Day. I hate commercialism and that's what so many holidays are now - the stores out to see how much they can get out of it. Seriously, a dozen roses about quadruples in price just because it's Valentine's Day. How ridiculous is that? My husband is such a romantic that he brings me roses and chocolates all year long. He takes me on at least one date every week, and I frequently receive cards in the mail from him. ♥
 
I was challenged though to come up with a craft for children to make for Valentine's Day and that set me thinking.
 
Here in Ontario where we live there is a holiday in February called Family Day. I think it's always on the third Monday of February. It's a day to encourage families to take some time out of their busy lives and spend the day together. Okay, I pretty much spend every day with my children, but of course, their dad doesn't so we try to make this a special day.
 
This year I thought I would combine a couple of ideas I found on Pinterest and make it a special day to show our love for each other.  Right now we're not sure if my husband is going to have the 17th off so we may be celebrating early - really early - like this Friday.
 
So, you ask, what are these ideas? First of all, I fell in love with this idea of a Treasure Hunt...the treasure being time spent together as a family doing things we love. Coming up with activities for our family to do is usually not a problem for me. I know we're going to start the day with pancakes (always a hit), and I'm probably going to do heart shaped ones. Then I'm going to announce a day off of school. I think that will score me a few great mommy points. ☺ Next we'll do a craft which I'll talk about in a minute. Then if the weather is nice we'll go for a walk or to the zoo (We have a membership so going to the zoo for an hour is always a fun thing). When we come home we'll warm up with a fun lunch (still to be decided) and then spend the afternoon watching a movie together.
 
I'm excited already. These are all simple activities that won't cost much but will add up to a lot of memories.
 
On to the craft. Again this is an idea from Pinterest (♥ Pinterest). I'm going to tweak it a little though. For the sake of time, I'm going to have the hearts pre-sewn. Then I'm going to have the children each pick each other's names. They will then draw a face on one side and write a message on the other for the sibling whom they have chosen.
 
I'll take pictures and let you know how it all goes. How does your family celebrate Valentine's Day (if you do)?

Pin It

Tuesday, 14 January 2014

A Simple Pouch

Today I decided to sew something for myself. Since I don't have a dedicated sewing space I can't leave my sewing machine and serger set up. I keep them on a shelf until I need them and their respective cords in a basket along with my hot glue gun. The problem is all the cords get tangled and hang out of the basket in a messy fashion. I decided to fix that and took the first step today.
 
I made a pouch for my glue gun and I'm going to do the same for the serger and sewing machine cords sometime this week. It was a simple project that I'm going to share because these pouches could be used for so many different organizing needs.
 
I didn't want ties for closing the pouch because they would look messy. Neither did I want a closure that I would need to open and close - I know - lazy but since I was doing this for myself I decided to go with exactly what I wanted. I used elastic to loosely keep the opening closed. It's wide enough to put the glue gun in and out and tight enough to hold it all in.
 
First I loosely measured my glue gun and decided I needed a pouch that was approximately nine inches square. So my fabric was about ten by twenty inches to account for seam allowances. I folded down one long edge and pressed it. Then I folded it down again a little more than the width of my fabric and sewed the casing for the fabric.


Figuring out the size of elastic I needed took a bit of trial and error, but I finally decided on ten inches which was about half the width. I threaded the elastic through until it was even with the raw edge and sewed that edge down. I finished threading the elastic through and sewed it down on the other side.


I wanted the seams to look nice, but I didn't want to drag my serger out for such a small project, so I went with French seams for the side and bottom. If you don't know what a French seam is they are very simple. First put your fabric wrong sides together and sew a small seam. Turn your fabric inside out so that the right sides are facing and sew a slightly larger seam so that the first one is totally encased. When you are finished you will have a beautiful finished seam with no raw edges showing on either side.


And there you have it - a simple pouch that my glue gun fits in with no cords hanging out. I used blue fabric because my glue gun is blue. I'm colour coding my pouches so I'll know what I'm grabbing - just trying to keep my life simple.


Do you have a dedicated area for sewing/crafts, or do you have to take everything out when you want to sew or craft?

Pin It

Monday, 13 January 2014

Putting Together a Doll House

Today I'm very happy to introduce you to my sister, Julie. We've had our up and downs in our relationship, but are closer today than we have ever been in our lives. We both homeschool. She has five children with one graduated already. She doesn't currently have a nursing baby, but she is as passionate about breastfeeding as I am. We both play the piano and love to sew. We Skype, chat on Facebook,  or call each other on the phone almost every day. She made an absolutely adorable doll house for her youngest daughter with the help of her two oldest daughters. I asked her to share with us about how they did this.

I love my big sister's blog on Healthy Simplicity.  My sister has inspired me over the years to dig deep into my creative being and start making more and more homemade gifts.  I think she would agree with me that it is certainly a dying art nowadays, and I'd love my children to take hold of it and keep it alive.

Since we have 6 out of 7 birthdays between September 24th and January 11th (never mind Christmas in between there too), I have started through the years to come up with "unique" gifts whether for their birthday or Christmas.
This year for my daughter's 6th birthday, we decided to buy her a used American Girl doll and then make her a play house and accessories to go along with her doll.


I went on Pinterest, and, boy, did I have fun thinking of accessories to make for her.
My two older daughters and I started with making a cut out of a house from cardboard.  We had some paper (thanks to work throwing it out) that served as the "wallpaper".  Emilie did a great job at cutting out the door and windows and covering it all with the pink plaid (the door is now covered, too).
Then, we went hunting for things around our house to use as well as clearance items at Joann Fabrics. Here's what we found.
Emilie started by taking the candelabra and broke off the wire sticking out. Then she hot glued the wooden frame to it for a table.  Next, she took fabric and hot glued it to the table top (we figured easier for Stef if it was in place).  Genevieve made a chair out of an empty tube, and they hot glued the legs on.  After this Emilie padded it with batting and covered the chair with some minky fabric.  She also sewed the curtains and took apart hangers to use as the curtain rods.  The tie backs are actually made with buttons.  Emilie came up with most of this, and she sewed the curtains, too.
For the fireplace, Emilie used cardboard, scrapebooking paper, a black garbage bag and other scrapes for the fire. I think she did a fabulous job!
I found these clip on miniature chalkboards at Joann Fabrics and Crafts in their dollar section and as you can see, she turned one into a picture on the mantel.  Genevieve made a bouquet of flowers and they put a pretty "necklace" on the mantel for her doll to wear. In browsing Pinterest for ideas, we saw someone had used a glass jar with fabric and batting glued on top for a storage/ottoman.  Sorry, I can't find the link again but it is quite simple - your items listed above and hot glue and voila you're done.
Genevieve made these flowers using pretty scrapbooking paper, pipe cleaners and buttons.  It was her idea and I think she did well.  Emilie took some tiny pots I had bought on clearance for 8 cents each and covered them with glitter.  Let's hope they stay on the pot!
Next, we found this jewellery holder (another item that was thrown out at work), and Emilie just added some shelving to it and Stef's doll now has a place to store her journals, her pens, her pots and anything else she wants.
 
We took another wooden frame and turned it around for a shelf. Emilie hot glued a mirror inside, and we found miniature toothbrushes at the dollar store.  She cut off the end and made a handle out of a pipe cleaner so the doll can hold it on her own.  We wanted to hang it on the wall but we weren't sure it would hold (the wall being cardboard).  I think Stef will have fun rearranging her furniture in her doll house.


Lastly, we made a journal for Stef's doll because every doll needs a journal to write her thoughts in.  We used a post-it note pad and covered it again with scrapbooking paper and made a flower pen. 
Emilie has gone over and above with these accessories, and she had so much fun. I'm sure we will be adding to it as time goes on.  For more ideas, you can go to my Pinterest boards - http://www.pinterest.com/gemsjewel/crafts/.  I have hopes to do a few more things for Stef, like plastic canvas hangers!
Now, as my sister knows, no dollhouse is complete without clothes for the doll to wear.  I made a coat, a couple of skirts, a blouse and a blanket for Stef's doll and doll bed.


All of these items including the clothes cost me less than $30!  Now THAT'S a deal! What girl wouldn't love this?  Can't wait for her to start playing with it and for us to play with her! Hope this has given you a few ideas of what YOU can do when you put your mind to it!



Pin It

Friday, 3 January 2014

Simple Giving


This post is longer than normal. It doesn't happen often so I hope you don't mind. ☺

It's that time of year when a lot of gifts are given and received. Our family even has three birthdays between the end of December and beginning of January. I really encourage our children to make as many of their gifts as possible. There really is nothing that can beat a handmade gift. I thought I would put together a list with a bit of instructions of some of our gifts this year. 

We'll start with my soon-to-be-six year old. He made notebooks for all of his siblings. Well, I made the notebooks and he decorated them. First I cut paper in half and then trimmed off a quarter inch from the length and height. I sewed the pages together on my sewing machine. He could have helped with that part, but I was rushing. Then I cut a piece of cardstock in half for the cover and with a sharp needle and then cotton yarn sewed the cover to the pages. Now my little guy picked fabrics and decorations according to the tastes of each of his siblings and sewed them on.


My younger daughters made fleece pouches for each other. The idea came from here. We sewed ours on the sewing machine and made them more "finished".


My youngest daughter made laundry bags for her two oldest brothers. She sewed a casing into the top of a pillowcase and we threaded cord through - easy peasy.

My middle daughter made a French cockade for her oldest sister which was the piece de resistance. When she first told me this is what she wanted to make for her sister I went online to research patterns. Nothing I found appealed to me so for weeks I pondered how to do it. Finally with one day to go I came up with a plan. Thankfully I had bought the ribbon in faith that I would figure something out. I overlapped the white ribbon onto the blue and using white thread sewed them together. Then I overlapped the red ribbon onto the white and using red thread sewed it. We then ran a basting stitch through the red ribbon and pulled it into a circle, tucked the ends under and sewed them down. Then my daughter sewed the circle onto a piece of felt and sewed a button onto the middle of the circle to hide the felt and stitching. I attached  a clip to the back and we were done. My oldest daughter was beyond thrilled. I think I can safely say that this was her favourite gift. Well, it could also have been the dvd about the French Revolution that her grandpa gave her. She's our resident expert on all things Les Mis and the various revolutions the French have lived through.


My two oldest boys with some help from their dad made a lego table for their little brothers. They painted an old smallish end table black. Then they glued a couple of base plates on top. Simple and useful.

My oldest son made a fleece ear warmer for his sister. The idea came from here and is super easy to make. I'm thinking about making one for myself.


My oldest daughter made clothes peg dolls for her sisters which they love already. We found the idea here.

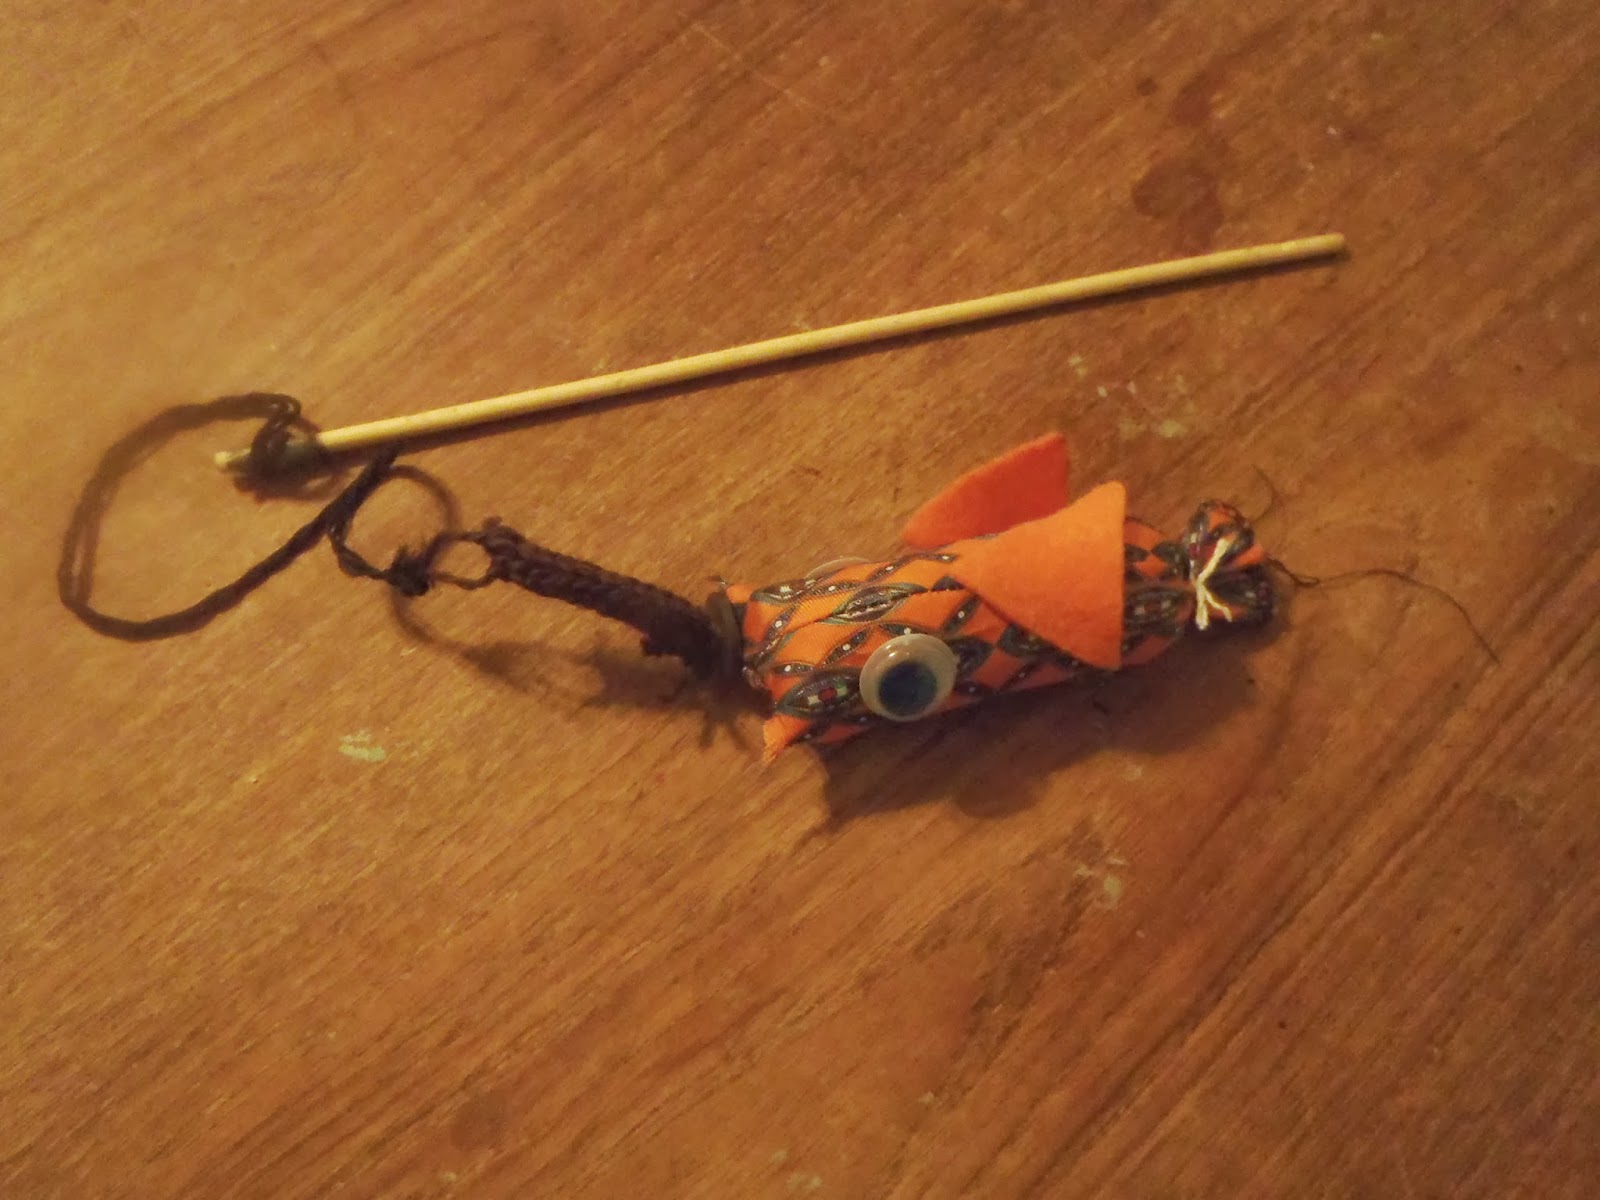
For our toddler his sisters made him a fishing game. We used old ties. We cut off a four to five inch length of tie (the skinny end) and turned it inside out and took out the lining. We sewed one end shut and serged the other end. They then turned the "fish" right side out and dropped a magnet in. They stuffed it about 80% and tied the end shut with string letting the fabric fan out like a tail. Then they glued eyes and felt fins on the outside. They made three of these. For the rod their oldest brother cut the sharp end off a bamboo skewer. We attached a piece of yarn for the line which had a knitted worm tied to it. The worm had a magnet glued to it, and now their little brother can go fishing. He loves this game and wants me to take his picture every time he catches a fish. ☺


We also did a set of "Sharpie" dishes for their grandparents. There are a lot of great tips here for doing this kind of craft. My five-year-old (with a lot of help because he didn't like the mess) made a puzzle piece bracelet for his grandma. I saw the picture on Pinterest but no instructions. We cut a toilet paper tube lengthwise. Then we cut off a width and glued the pieces on. If I did another one I would modge podge the width before gluing the pieces on to give the base more stability. All in all it turned out quite nicely.


The two gifts that I'm most pleased with that I made were a mai tei carrier for her doll with a matching diaper bag for my youngest daughter and an embellished notebook cover for my slightly-notebook-obsessed oldest daughter. I thought a long time about the design for the mai tei carrier. I knew it didn't need as many ties as mine. I finally made the back a shrunk-down version of mine and added straps to the waist that cross her chest and button to the shoulders. The diaper bag pattern came from here and was super easy to make. She was so happy and has been carrying her baby everywhere on her back.


For my oldest daughter I followed the pattern I did for sewing a cover for a binder but did it for a notebook instead. She's not a frou-frou kind of girl so I just added some simple embellishments. She loves wearing denim so I used that for the fabric - it's actually from a skirt that she wore out. I also added a button and elastic to close it.


Finally, I made something for myself - a shawl to wear over my coat and baby when we go for walks. I worry about him being warm enough because he's not exercising (believe me, I am with him on my back). That's one reason I made leg warmers for him. I wanted something more though and found this pattern. I made mine in red with a black serged edge. It was so simple to make and works great.

So we managed to get everything done and have fun at the same time. Check out my Pinterest boards where I store a lot of ideas of things I want to make.

What have you made lately that you're pleased with?


Pin It